


Garden Path DIY Making Mould
About SHEREM
SHEREM is a business that specializes in garden decoration hummingbird feeders. We strive to provide the best products for your garden and the best service for our customers. Our products are made from all natural, eco-friendly materials and are designed to attract hummingbirds. Our main goal is to make your home a beautiful place and to help you give back to nature.
We want to create a great place where people can forget their worries, spend time with their family and friends, and feel the joy of living.

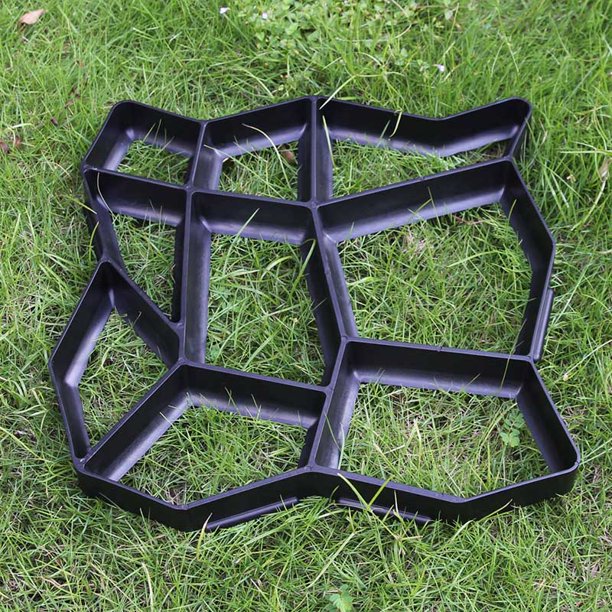
This form for concrete will be an indispensable accessory for all do-it-yourselfers.
For example, pave your terrace, pool area or make a new sidewalk .
Thanks to the concrete mold Master Dlaždič, you can improve the surroundings around the house exactly according to your ideas.
Manipulation of the form is very easy and any good handyman can do it.
The mold is made of special plastic and the concrete does not stick to the mold.
Do-it-yourselfers and regular construction workers often want to make working with concrete easier and add too much water to it. They don't want the thick concrete to expand, so they dilute it with water, but this reduces its strength. This applies especially to floors. The denser the concrete, the harder it is for the workers to work with, but it's necessary because when the concrete thins, the cement flows out and that's bad. Although concrete is usually the material that every builder tries to save as much as possible on, keep in mind that it may not be worth it. So it's always a good idea to consider whether you can handle concreting without professionals.
How much concrete will you use?
Approximately for 3 forms you will use one bag of concrete mixture weighing 25 kg.
Package contents:
- 1x mold for concrete sidewalks
- Instructions for use
Technical specifications:
- Material: plastic
- Black colour
- Mold dimensions: 40 x 40 cm
- Mold height: 4 cm
DETAILED PICTURE PROCEDURE
1. Here we see the place where we want to finish a part of the sidewalk using the Master Tiler mold

2. We remove the excess grass, which thanks to careful removal can be used, for example, on another part of the garden and thus quickly grass the place where grass is not currently growing.
The place where we want to have concrete stones is thoroughly leveled and tamped down. If you know in advance that you will put more stress on this place, that for example you are concreting the area in front of the garage, where a car will sometimes be parked, you need to concrete this place and only then make these decorative stones.

3. We start mixing the concrete. We asked the building materials department for advice on which concrete would be the best for our purpose, and we also bought dye to add a different color to the sidewalk. You can easily create a beautiful mosaic, because there are a lot of colors on sale!
Mix the concrete according to the instructions, because each brand and type is mixed a little differently. Since we need the concrete to be as dense as possible, we will remove some water. We don't want to pour concrete over the surface, but we need it to hold its shape and "stand".


4. Place the mold on the prepared surface as close to its edge as possible so that the "flat side" is on top.
Begin to gradually pour the prepared concrete into the form, which you thoroughly compact and smooth according to the flat parts on the form.
Once you're done smoothing, wait a few minutes for the concrete to set. Then carefully pull out the mold and place it next to the finished stones.
The individual edges of the mold fit together like a puzzle, so that the stones are close together.
You can immediately continue filling out the form.


5. Did you fill in the entire prepared area? So you're done! Allow the concrete to dry according to the supplier's instructions.
If you like, you can fill the joints with a different color of concrete, fill them with sand, gravel, or wait until the grass grows.
All variants look very nice and effective, even if you leave the joints bare.
Enjoy many years of self-made pavement!
